October 29, 2015
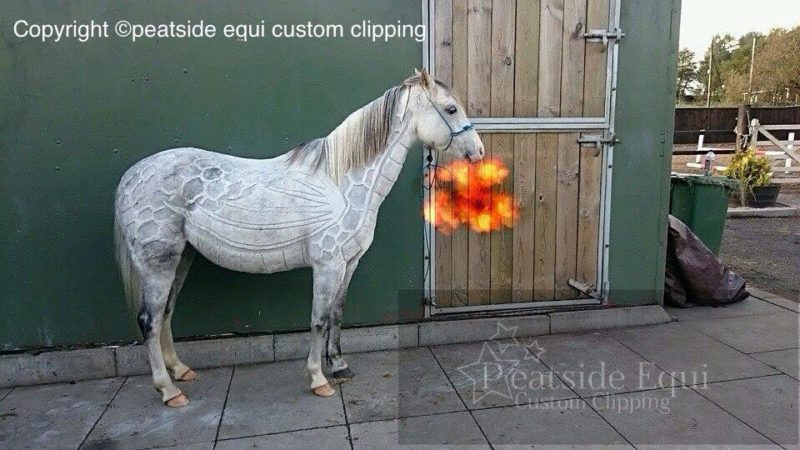
Jillian Scott’s horse artwork is really quite extraordinary, but she doesn’t require any brushes or paints. Nor does she take photographs, or sculpt life-sized horses out of copper or steel. In fact, horses aren’t so much the subject of Jillian’s art as they are the art, itself. That’s because Jillian Scott is a body clipping artist—taking the chore that most of us grumble and sweat over, and turning it into her own brand of creative self-expression.
Based outside of Glasgow, Scotland, the owner of Peatside Equi Custom Clippinggave us the scoop on what it’s like when your artistic palette is a shaggy, overgrown pony; why she’ll never use stencils; and what five things every aspiring clipping artist should know.
1. What was your first body clipping experience like?
I got my first clippers at around the age of 12. I wasn’t taught how to clip, it was very much trial and error, and my pony Gypsy—a 13.2-hand cob—had some very dodgy hairdos in those early days! Once I got the hang of things, I experimented with shapes, [and] basic designs like hearts and stars, which I often did on kids’ ponies at the livery yard I worked at.
2. How did you come up with the idea to combine art and body clipping?
(Courtesy of Peatside Equi Custom Clipping)
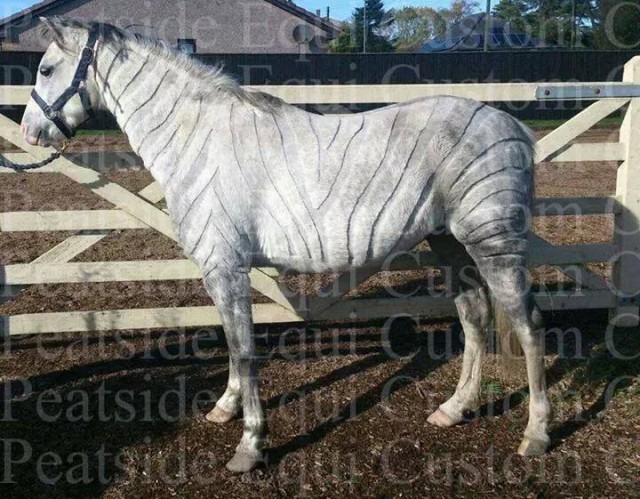
The first full-on ‘creative’ I did was a zebra clip two years ago. One of my ponies is very sensitive, and I struggled to keep him happy during the winter months. Leave his hair on and he would sweat buckets, clip him and he was chilly and tense. I didn’t like how he felt with “traditional” clips such as a blanket (where the front end is clipped off and the back is left hairy), because I had to blanket him to keep his front end warm, but I felt his rear end would still overheat. Clipping stripes left evenly spaced patches of hair throughout his body; he was neither too warm nor too cold, and [stayed] an even temperature under his blanket. Plus it looked amazing!
I started clipping during the winter for pocket money to keep me ticking, because I couldn’t take horses for backing during the winter due to my lack of indoor arena and our harsh Scottish weather. When I started doing creatives, I became well known for being different. The clipping became a full-time winter income, I began to get customer requests, and Peatside Equi Custom Clipping was born!
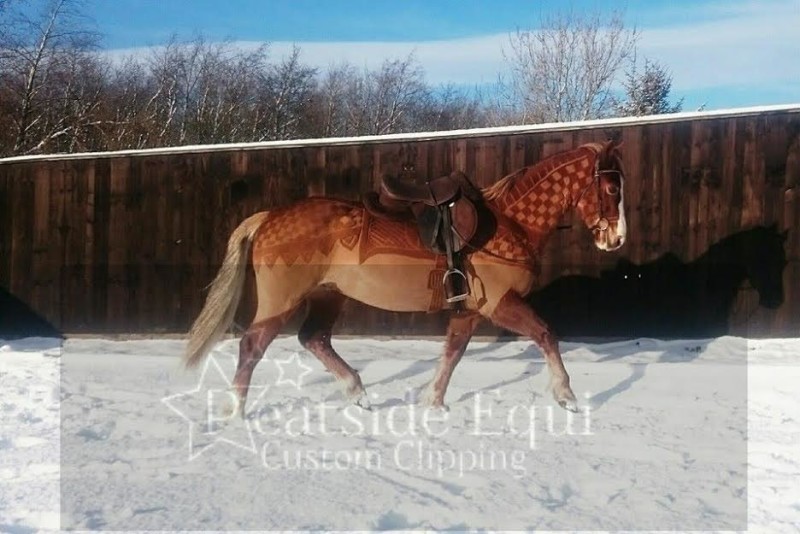
3. What’s your favorite kind of creative clip to do?
(Courtesy of Peatside Equi Custom Clipping)
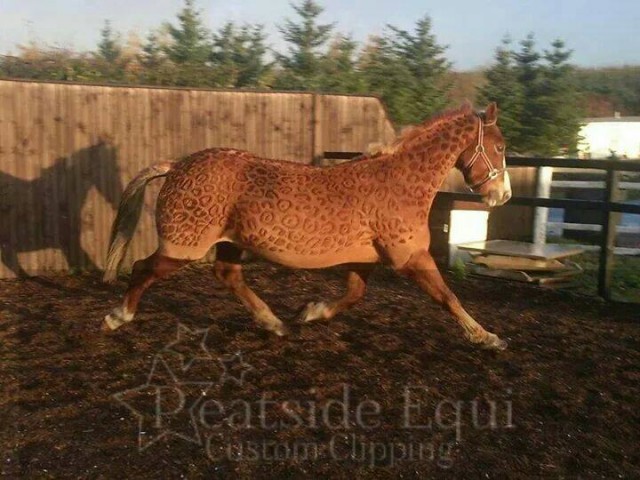
The leopard clip is probably my all-time favorite because I’ve never seen anyone else try to replicate it. I also loved the knight clip I did last year, because my pony Cody is my knight in shining armor. He saved me when my previous horse Bob died, and my world fell apart. I wouldn’t be here today if Cody hadn’t kept me going.
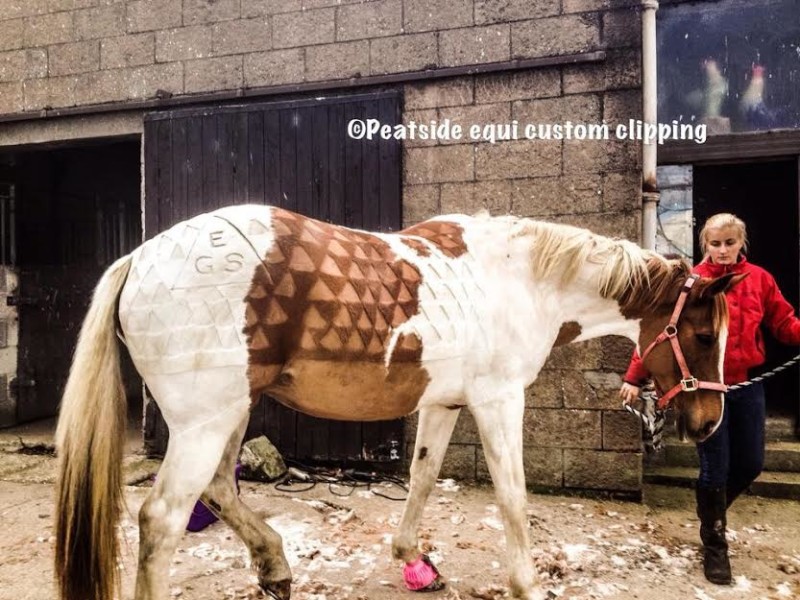
The “EGS” clip was done to raise awareness for Equine Grass Sickness (EGS) and to help raise money [for] research. The triangles represent the three types of Grass Sickness, and the three horses that my friends lost to this awful illness that we have in the UK. They set up the “EGS Clip for a Cure” campaign.
4. What makes a pony a good (or bad) candidate for creative clipping?
(Courtesy of Peatside Equi Custom Clipping)
Any pony with a good clean coat is a great candidate for creative clipping. Dirty ponies aren’t good to clip at all, even for ordinary clips, because the grease clogs the blades, is less comfortable for the horse, is bad for the clippers, and prevents you from making nice crisp, sharp lines on creatives.
5. Do you have any tips for working with horses that are new to or nervous about clipping?
(Courtesy of Peatside Equi Custom Clipping)
With any new horse, I will let them look at and sniff the clippers when they are turned off, then I will run my hand over them while holding the clippers. When I first start the clippers, I put my other hand on the horse, just behind their shoulder. Then I will hold the clippers to my chest, [so] the horse will feel the vibration down my arm. I then move the clippers down my arm so the vibration increases, until the clippers are on top of my other hand, which I then remove, and begin to clip the horse.
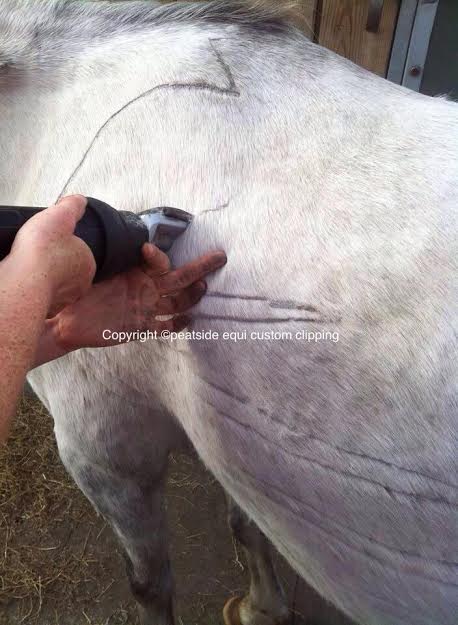
6. What kinds of special blades and tools do you need for creative clips, and how do you maintain them?
I have lots of different blades for different jobs, and different coat types, and for my smaller clippers, I have an additional special blade called a ‘toe blade’, which is [a dog grooming tool] for getting between a dog’s toes and pads. The toe blade clips very close to the skin, so I use it when I need to make a design standout more, as it draws a line around the design in a different color.
I clean my clippers thoroughly after every clip, brushing hair from the air vents and motor. Blades are oiled every five to ten minutes [while I’m clipping], and I disinfect them between each yard. Because I have two sets of both big and small clippers, I never have to wait and swap blades if they get warm; I just switch to another set of clippers, which saves time.
7. What about stencils for your creative clips?
(Courtesy of Peatside Equi Custom Clipping)
I have never used stencils to clip. I feel that’s something any owner could do by themselves. Nor do I draw the outline of designs in chalk. Everything is freehand, which is more exciting and challenging. I love not quite knowing how something’s going to turn out, and my customers like watching a design unfold before them!
8. What kind of tips do you have for people who’d like to give creative body clipping a try on their own horses?
(Courtesy of Peatside Equi Custom Clipping)
- Make sure your horse is clean when doing any clipping.
- For creatives, start simple; try basic shapes. Experiment by holding the clippers in different ways, and find out what you can do with that.
- If you are doing a full clip with a fuzzy design left on the rump, start big. If you draw a large design and it’s a bit squint, you can always trim it down a little until you get it right.
- For a design clipped into the fuzz, do the opposite. Start small and gradually work it up to the size you are happy with.
- Most of all, if you make a really big mistake, who cares? It’s just hair, it grows back!